
In this article, we introduce how to import the following data and settings.
You can perform import (load) operations for the following data into Flow.
POS data (sales, number of items, number of transactions)
Sales target data
Visitor count data
Staff count data
Regular operating hours
Special operating hours
For example, this is useful when:
I want to view sales data in Flow.
I want to view purchase rates in Flow.
I want to check budget progress in Flow.
I want to see staff-related KPIs in the report.
I want to set store hours all at once.
I want to overwrite data.
To import data into Flow, follow the steps below.
Access the data import screen
Get the file template for data import
Enter data into the file template
Import the filled file from the data import screen
Please select [Tools] -> [Data Import] from the menu bar.
Confirm that the screen has transitioned to the Data Import screen.
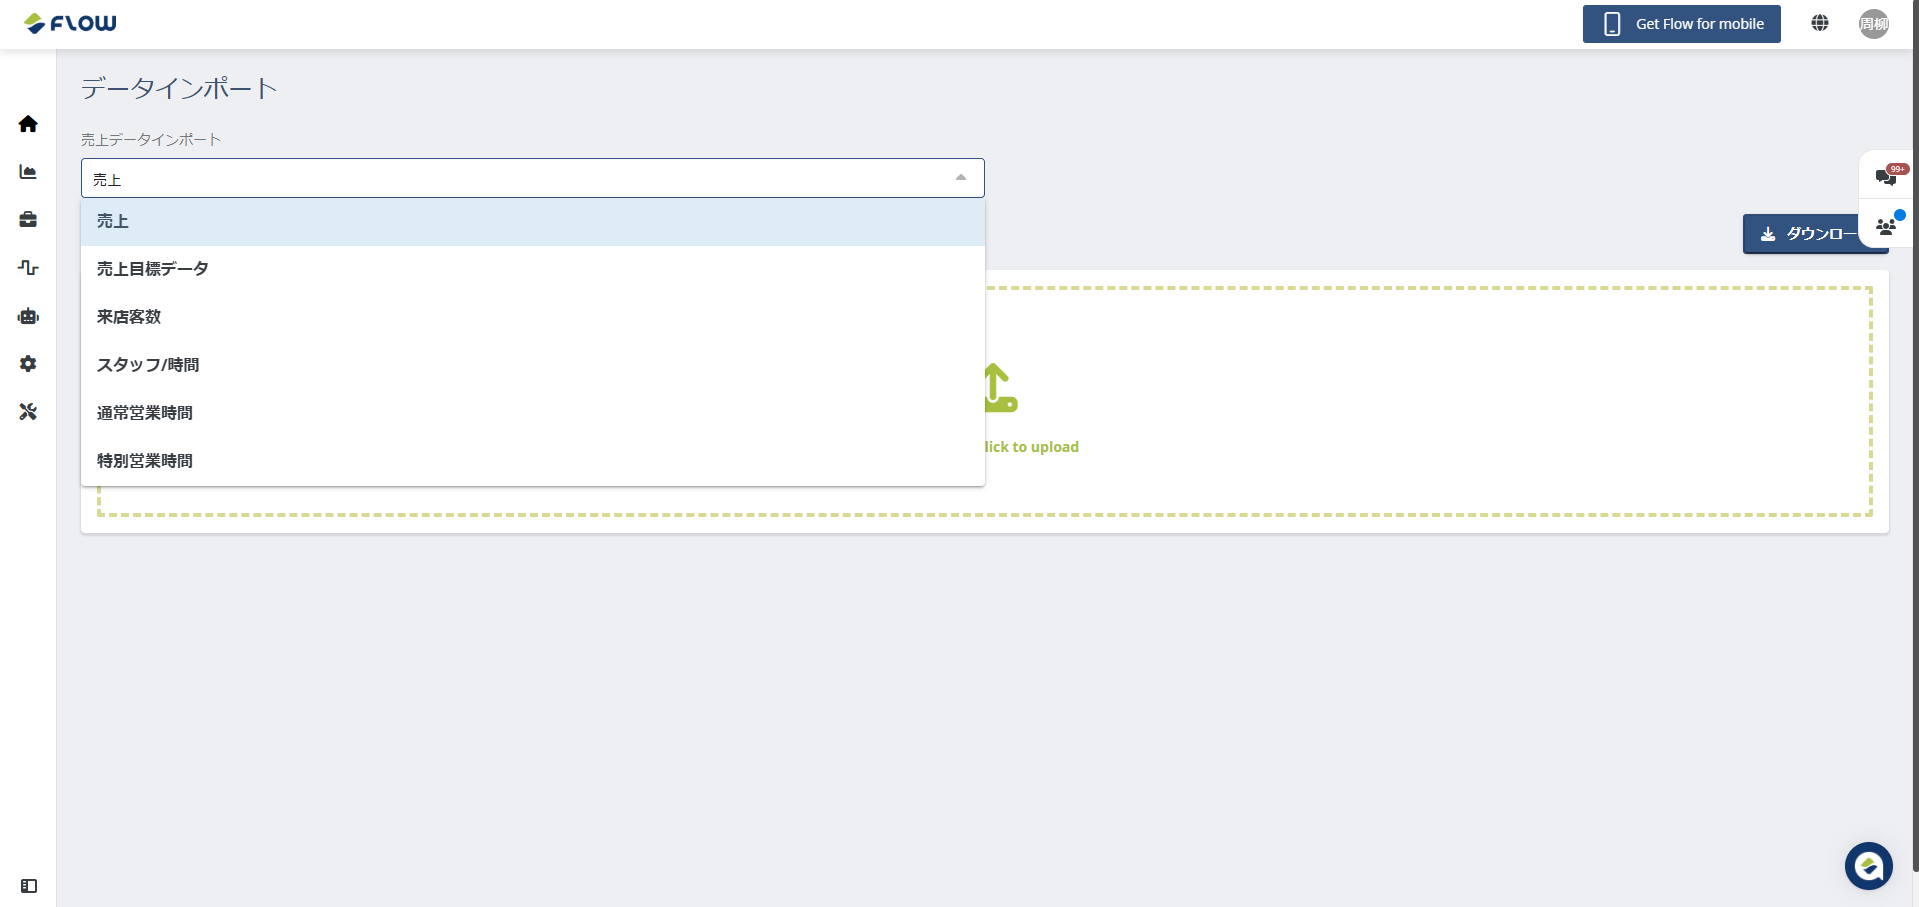
Based on the type of data you wish to import, please download the template by following the steps below. See Fig. ② for reference.
Fig. ②
POS data (Sales, number of items, number of transactions)
Select 'Sales' from 'KPI Selection'.
Press the 'Download' button.
After pressing the 'Download' button, confirm that 'sales-template.csv' has been downloaded.
Sales target data
Select 'Sales Target Data' from 'KPI Selection'.
Press the 'Download' button.
After pressing the 'Download' button, confirm that 'sales-target-template.csv' has been downloaded.
Visitor Count Data
Select "Visitor Count" from the "KPI Selection" menu.
Press the "Download" button.
After pressing the "Download" button, confirm that "traffic-template.csv" has been downloaded.
Staff Count Data
Select "Staff/Hours" from the "KPI Selection" menu.
Press the "Download" button.
After pressing the "Download" button, confirm that "staff-hours-template.csv" has been downloaded.
Regular Hours Settings
From 'KPI Selection,' select 'Regular Operating Hours.'
Press the 'Download' button.
After pressing the 'Download' button, confirm that 'Regular_operating_hours-template.csv' has been downloaded.
Special Operating Hours Settings
From 'KPI Selection,' select 'Special Operating Hours.'
Press the 'Download' button.
After pressing the 'Download' button, confirm that 'Special_operating_hours-template.csv' has been downloaded.
If you’re using Excel to edit CSV files, please also refer to this article.
Notes for importing via CSV
How to avoid Excel dropping leading zeros when you open the import template, and the correct way to edit it.
POS Data (Sales, Product Count, Transaction Count)
Column | Field | Details |
|---|---|---|
Column A | Store Code (店舗コード) | Please enter the store code of the store where you want to import the data using single-byte digits. |
Column B | Transaction Date (日時) | Please enter the date of the data to be imported using single-byte digits. (Example: For August 1, 2020 ⇒ 20200801) |
Column C | Transaction Hour (時間) | Please enter the time of the data to be imported using single-byte digits. (Example: For 10:00 ⇒ 1000) |
Column D | Total Transactions (Number of Transactions) | Please enter the number of transactions (receipt count) within the time range specified in column C using half-width numbers. (Example: For 100 transactions ⇒ 100) |
Column E | Items Sold (Number of Items Sold) | Please enter the number of items sold within the time range specified in column C using half-width numbers. (Example: For 200 items ⇒ 200) |
Column F | Sales Amount (Revenue) | Please enter the sales amount within the time range specified in column C using half-width numbers. (Example: For 100,000 yen ⇒ 100000) |
*Please do not edit the header in the first row.
File Format
Only CSV files are supported. When saving, select "CSV (Comma delimited)" as the file type.
Sales Target Data
➢ Please do not edit the header in the first row.
Column | Field | Details |
|---|---|---|
Column A | Store Code (店舗コード) | Please enter the store code for the store where you want to import the data in half-width numbers. |
Column B | Date (日時) | Please enter the date of the data to be imported in half-width numbers. (Example: For August 1, 2020 ⇒ 20200801) |
Column C | Sales Target (Target Value) | Please input the target value for the date specified in Column B using half-width numbers. (Example: For 100,000 yen ⇒ 100000) |
File Format
Only CSV files are supported. When saving, select "CSV (Comma delimited)" as the file type.
Customer Traffic Data
Column | Field | Details |
|---|---|---|
Column A | Store Code (Store Code) | Please input the store code for the store where you want to import data using half-width numbers. |
Column B | Date | Please input the date of the data to be imported using half-width numbers. (Example: For August 1, 2020 ⇒ 20200801) |
Column C | Time | Please enter the time of the data to import using half-width numbers. (e.g., for 10:00 ⇒ 1000) |
Column D | Entrance | Please enter the entrance for visits to be imported, matching the time specified in Column C, using half-width alphanumeric characters. (e.g., for Entrance 1 ⇒ EN1) *For entrance numbers, please refer to the DMS sheet you filled out during onboarding. If you have any questions, please contact our customer support team. |
Column E | IN_OUT (Entry/Exit) | Please enter the format (IN/OUT) for the entry you specified in Column D using alphanumeric characters. (Example: For entry ⇒ IN, for exit ⇒ OUT) |
Column F | Traffic (Number of People Passing) | Please enter the number of people passing through the entry format (IN or OUT) specified in Column E using numeric characters. (Example: For 1000 people ⇒ 1000) |
*Please do not edit the header in the first row.
File Format
Only CSV files are supported. When saving, select "CSV (Comma delimited)" as the file type.
Staff Number Data
Column | Field | Details |
|---|---|---|
Column A | Store Code | Enter the store code of the store where you want to import data in half-width numbers. |
Column B | Staff Hour Date (Date) | Enter the date of the data to import in half-width numbers. (Example: If it's August 1, 2020 ⇒ 20200801) |
Column C | Staff Hour Time (Time) | Enter the time of the data to import in half-width numbers. (Example: If it's 10:00 ⇒ 1000) |
Column D | Staff in Store (Number of Staff) | Enter the number of staff for the time slot specified in Column C as half-width digits. (Example: For 10 people ⇒ 10) |
*Please do not edit the header in the first row.
File Format
Only CSV files are supported. When saving, select "CSV (Comma delimited)" as the file type.
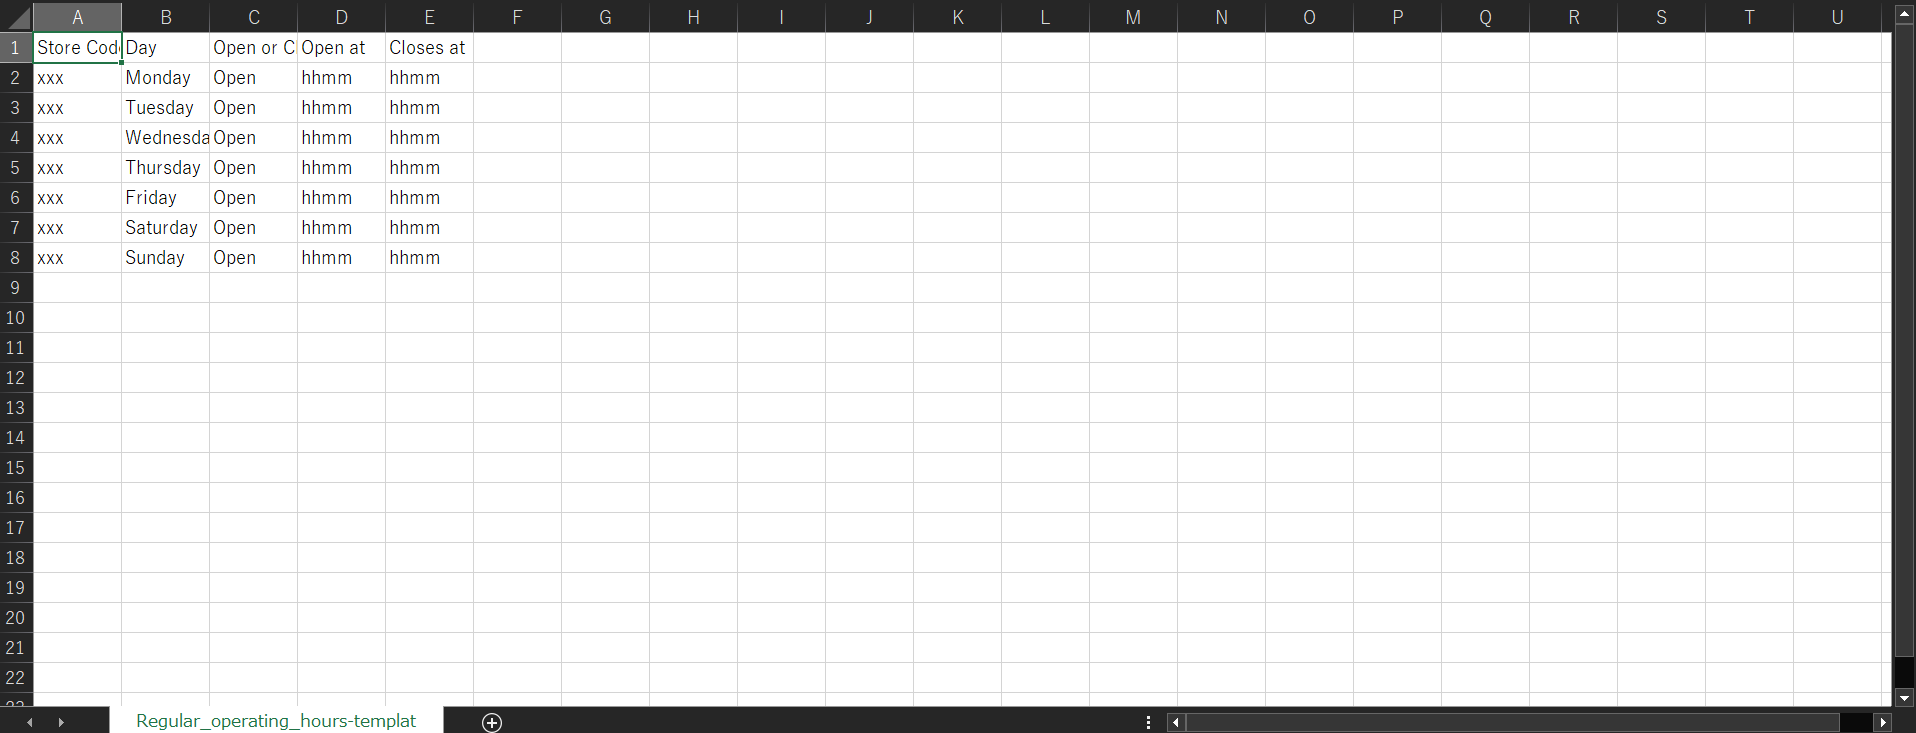
Regular Operating Hours Settings
Column | Field | Details |
|---|---|---|
Column A | Store Code (店舗コード) | Enter the store code of the store where you want to import the data as half-width digits. |
Column B | Day (曜日) | Enter the day of the week in English. (Example: Monday: Monday, Tuesday: Tuesday, Wednesday: Wednesday, Thursday: Thursday, Friday: Friday, Saturday: Saturday, Sunday: Sunday) |
Column C | Open or Close (Business Status) | Please enter whether the target day is open or closed in English. (Example: Open: Open, Closed: Close) |
Column D | Open at (Opening Time) | Please input the opening time in string format. (Example: For opening at 9 AM ⇒ 0900) |
Column E | Close at (Closing Time) | Please enter the opening time in string format. (Example: If closing time is 11 PM ⇒ 2300) |
*Please do not edit the header in the first row.
File Format
Only CSV files are supported. When saving, select "CSV (Comma delimited)" as the file type.
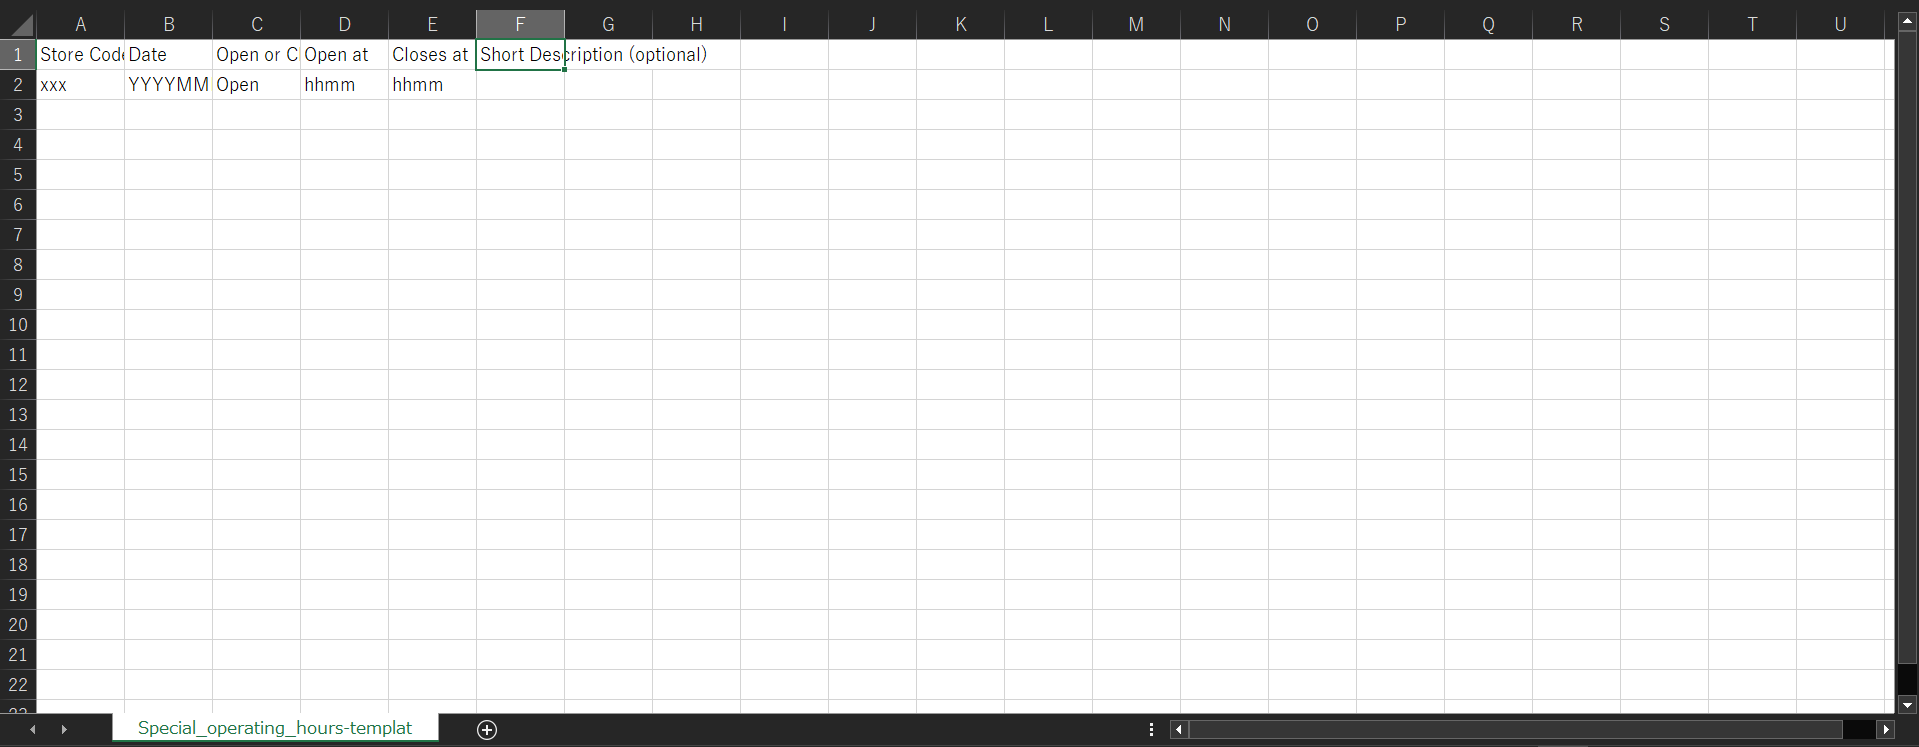
Special Operating Hours Settings
Column | Field | Details |
|---|---|---|
Column A | Store Code (店舗コード) | Enter the store code of the store you want to import data for, using half-width digits. |
Column B | Date (日時) | Enter the date for changing operating hours, using half-width digits. (Example: For August 1, 2020 ⇒ 20200801) |
Column C | Open or Close (Open/Close Status) | Enter whether the target date is open or closed in English. (Example: Open: Open, Close: Close) |
Column D | Open at (Opening Time) | Enter the opening time in string display format. (Example: If opening at 9 am ⇒ 0900) |
Column E | Close at (Closing Time) | Enter the closing time in string display format. (e.g., Close at 11 PM ⇒ 2300) |
Column F | Short Description (Details) | Please enter the detailed schedule content. (e.g., Year-end Holiday) |
*Please do not edit the header in the first row.
File Format
Only CSV files are supported. When saving, select "CSV (Comma delimited)" as the file type.
The import methods for each data type are as follows.
File Size Limit:
45KB
POS data (Sales, Product Volume, Transaction Count)
To upload the completed format, select the file from [Data Upload] on the [New Upload] screen, then click [Apply]. This completes the import.
Sales Target Data
To upload the completed format, select the file from [Data Upload] on the [New Upload] screen, then click [Apply]. This completes the import.
Visitor Data
Select "Visitor Count" from the KPI selection.
Choose the file you created from 【Drop File or Click to upload】.
Staff number data
From KPI selection, choose "Staff/Time."
Select the file created from 【Drop File or Click to upload】.
Regular business hours settings
From KPI selection, choose "Regular business hours."
Select the file created from 【Drop File or Click to upload】.
Special business hours settings
From KPI selection, choose "Special business hours."
Select the file created from 【Drop File or Click to upload】.
If issues like "Data Import is not visible" are observed, please check the "Roles" settings.
Some parts of the settings menu are not visible
Unable to perform the import operation
Only administrators and accounts with the necessary permissions can configure the "Roles" settings.
The steps above cover manual data import. If you'd rather not repeat this process regularly, Flow also supports automating your data imports.
Automated import connects your data source directly to Flow, so files no longer need to be downloaded, filled in, and uploaded by hand. Our team sets this up together with you.
To get started, contact us at [email protected].
